Project 3: Rails Backend with Docker
This project builds upon Project 2 by having you create your own Rails backend that implements the same API you integrated with in the previous project. You’ll develop this application using Docker containers to get familiar with containerized development.
This team can be completed alone or in teams of 2. If you choose to work as team, you must send me a message on Piazza by Wed 10/29 at 10am listing who you will be working with on this project.
Learning Outcomes
- Student can create a Rails API application using the Rails API generator
- Student can implement REST API endpoints following a specification
- Student can configure Rails to work with MySQL database
- Student can develop applications using Docker containers
- Student can use Docker Compose for multi-container development
- Student can implement authentication and authorization in Rails
- Student can work with Rails models, controllers, and routes
- Student is familiar with Rails testing framework
Project Submission
https://forms.gle/hicZ2SNaVhb3ApXQ7
What’s Included
- Docker Environment: Dockerfile and docker-compose.yml for containerized development
- API Specification: Complete API documentation that your Rails app must implement
- Database: MySQL database configured for Rails development
Download the Project
Download the starter project: project3.zip
Starter Contents:
API_SPECIFICATION.md - the spec to be implemented
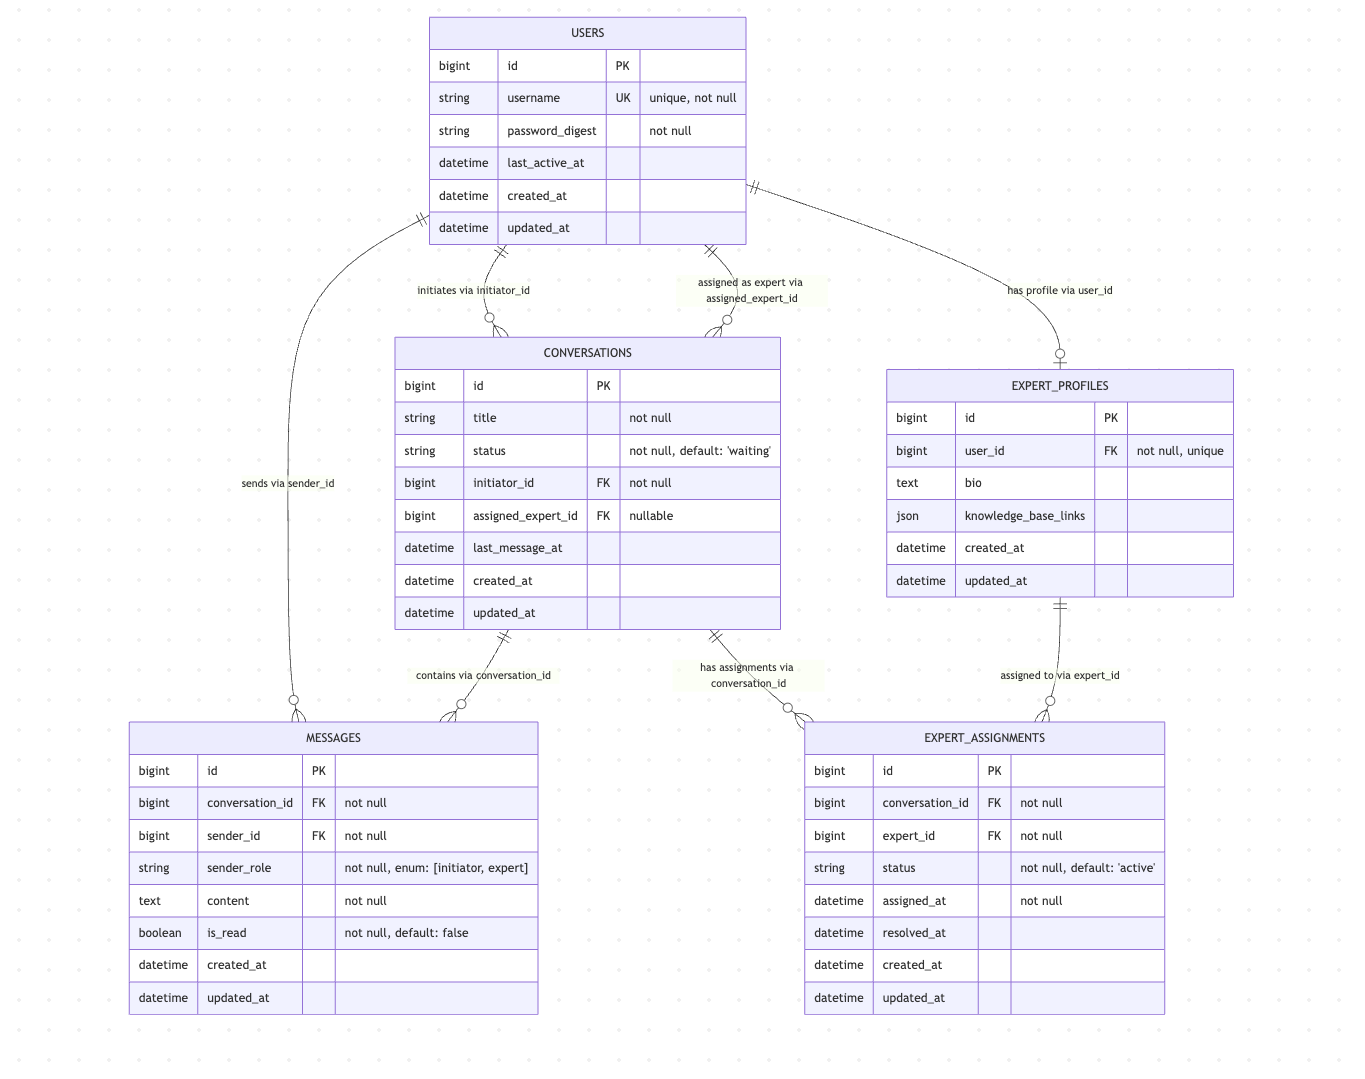
project3_er_diagram.png - ER diagram for the models and relationships needed to implement the API spec
docker-compose.yml - basic docker-compose setup for running a db and web container in development
Dockerfile - Configuration of the web container
/app/services/jwt_service.rb - Simple service class for creating JWT tokens used for authentication
/test/requests/auth_test.rb - Test that will validate that your auth endoints work as expected
/test/requests/cookie_configuration_test.rb - Test that will validate that your session cookie is properly configured
/test/requests/conversations_test.rb - Test that the conversation api endpoints work as expected
/test/servuces/jwt_service_test.rb - A test for the provided jwt_service.rb file \
Quick Start
- Extract the project files:
unzip project3.zip cd project3 - Start the development environment:
docker-compose up -d - Access the Rails container:
docker-compose exec web bash - Inside the container, create your Rails API app:
# Install Rails if not already installed gem install rails # Create new Rails API application rails new . --name help_desk_backend --api --skip-kamal --skip-thruster --database=mysql # Add required gems to Gemfile gem "rack-cors" # For handling Cross-Origin Resource Sharing (CORS) requests from the frontend gem "jwt" # For JSON Web Token authentication (if you choose JWT over sessions) gem "activerecord-session_store" # For database-backed session storage group :test do gem "mocha" end # Add the following line to help_desk_backend/test/test_helper.rb require "mocha/minitest" # Install dependencies bundle install # Create the database rails db:create # Start the Rails server rails server -b 0.0.0.0 -p 3000 - Access your application at
http://localhost:3000
Development Environment
Services
- web: Rails development container with Ruby 3.4.5
- db: MySQL 8.0 database server
Ports
- 3000: Rails development server
- 3306: MySQL database
Session Configuration
For API applications, you’ll need to configure database-backed sessions:
- Generate session migration:
rails generate active_record:session_migration - Run the migration:
rails db:migrate - Add session middleware in
config/application.rb:config.middleware.use ActionDispatch::Cookies config.middleware.use ActionDispatch::Session::ActiveRecordStore, { expire_after: 24.hours, same_site: Rails.env.development? ? :lax : :none, secure: Rails.env.production? }
This setup allows your Rails API to maintain user sessions across requests, which is essential for authentication functionality.
CORS Configuration
After adding the rack-cors gem, configure it in config/application.rb:
# Add this inside the Application class
config.middleware.insert_before 0, Rack::Cors do
  allow do
    origins [
        'http://localhost:5173',
        'http://127.0.0.1:5173',
    ]
    resource '*',
      headers: :any,
      methods: [:get, :post, :put, :patch, :delete, :options, :head],
      credentials: true
  end
end
This allows your frontend application to make requests to your Rails API when hosted in different domains. Even though both may be hosted on localhost during development localhost:3000 is considered a different domain that localhost 5173.
Assignment Files
You should also have received these files with your assignment:
API_SPECIFICATION.md- Complete API documentation that your Rails app must implement
What You Need to Implement
Rails API Application
Create a Rails API application that implements all endpoints specified in the API_SPECIFICATION.md file. The API should include:
Below is a possible organization of your application. It is not the only possible organization.
Controllers:
- AuthController (Uses session cookie for authentication where needed (register and login do not require auth) )
- ConversationsController (Uses JWT for token based authentication)
- MessagesController (Uses JWT for token based authentiation)
- HealthController (No authentication neccessary)
- UpdatesController (Uses JWT for token based authentication)
- ExpertContriller (Users JWT for token based authentication)
Models:
- User
- Message
- Conversation
- ExpertAssignment
- ExpertProfile
Docker Development
- Use the provided Dockerfile and docker-compose.yml
- Ensure your application runs properly in containers
- Test that the database connection works correctly
Implementation Strategy
- Use github from the beginning
- Consider breaking down the work into a set of tasks in a TODO style list. For Example
- Create a git repo
- Get the server running in the docker environment
- Add the User model
- adds db migration
- creation of ActiveRecord model file
- adds any Tests for the User model
- Add the UsersController with a registration action
- adds The UsersController file
- adds an action to the Users Controller file for registering a new user
- adds an entry to the routes.rb file for the new controller action
- adds tests of the user registration controller action
- …
- Commit small changes frequently with meaningful commit messages. For example
- Creating the User Model
- Adding the UsersController with a registration action for new users
- …
- Consider when you want to implement authentication/authorization
- Could you delay implementing authentication or authorization or both until after you have implemented the api functionality?
- What are the pros and cons of this?
- Could you delay implementing authentication or authorization or both until after you have implemented the api functionality?
Testing Your Implementation
Writing request tests
- Use the example test files provided in the starter package to test your AuthController and ConversationsController.
- Writing additional tests that follow the same structure for your other controllers will help you confirm your code is working without needing to integrate with the front end.
Using the Project 2 Frontend
- Start your Rails backend (running on
http://localhost:3000) - Run your Project 2 frontend from the previous assignment
- Configure the frontend to point to your Rails backend:
- Go to Settings in the frontend
- Change Backend Mode to “API (Real Backend)”
- Set API Base URL to:
http://localhost:3000 - Save configuration
- Test all functionality using the frontend interface
API Testing
If you need to, you can also test your API directly using tools like:
- Postman for API testing
- curl commands from the terminal
- Rails console for database testing
What you will turn in
- A link to your github repo containing your backend implementation
- A video walk through of your frontend (project2) and backend (project3) applications working together to accomplish the following flows
Cases to cover in demo video
- Registration of a new user
-
Login of the new user
- As a question asker
- starting a new conversation
- Show the new conversation appears in the conversation list
- view their list of created conversations
- list of conversations only includes conversations initiated by the current user
- posting a message to a conversation
- receive a new message for a conversation without refreshing the screen
- As an expert
- modifying expert profile
- view the list of conversations initiated by other users
- claiming a conversation as an expert
- responding with a new message to a claimed conversation
- receive a new message for a conversation without refreshing the screen
- unclaim a conversation
Getting Help
- Refer to the Rail Intro lecture slides
- Refer to API_SPECIFICATION.md file
- Compare output for project2backend.cs291.com
- Ask questions in Piazza
- Pair with classmates
- Schedule time with the intructor to get assistance